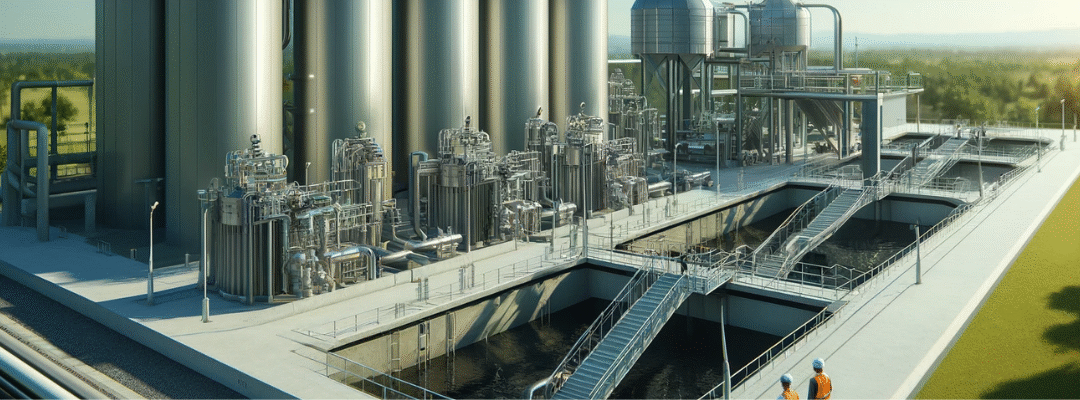
We pride ourselves on being a leading manufacturer and supplier of high-quality sewage treatment plant (STP) tanks. With over 15 years of industry experience, we specialize in designing effective and sustainable STP tanks that cater to the diverse needs of our clients while adhering to stringent industry standards. This article outlines essential design considerations for constructing efficient STP tanks, drawing from our extensive expertise and real-world applications.
Understanding the Treatment Process
Selecting the right treatment process is fundamental to the effectiveness of your STP tank. Our team of experienced engineers guides you through each treatment stage, ensuring optimal performance tailored to your specific project needs.
Primary Treatment
Incorporating sedimentation tanks and screening systems is crucial for effectively removing grit, debris, and floating solids from raw sewage. Proper primary treatment can reduce initial pollutant loads by up to 60%, enhancing the efficiency of subsequent treatment stages. For instance, in a recent project for a municipal client, we implemented a state-of-the-art screening system that significantly minimized maintenance needs and improved overall system reliability, resulting in a 20% reduction in operational costs.
Secondary (Biological) Treatment
Utilizing activated sludge systems, trickling filters, or sequencing batch reactors supports microbial degradation. Our designs create optimal conditions for microbial growth, which is critical for maintaining treatment efficacy. By optimizing aeration rates and tank configurations in a recent installation, we achieved a 30% increase in treatment efficiency, showcasing our commitment to innovative solutions backed by industry best practices.
Tertiary Treatment
Consider advanced processes such as chemical coagulation, sand filtration, and disinfection methods (e.g., chlorine or UV) for enhanced treatment and pathogen removal. Our team stays updated with the latest technologies and regulatory standards, ensuring that our designs not only meet but exceed compliance requirements, as validated by third-party audits.
Capacity and Flow Rate Considerations
Understanding capacity and flow rate is vital for STP tank design. Our engineers utilize sophisticated modeling tools for accurate assessments tailored to your project needs.
Influent Flow Analysis
Calculating daily average and peak sewage flow rates is essential to design tanks that can handle peak hydraulic loads without overflow or process disruption. This ensures seamless operation during heavy rainfall or peak usage times, safeguarding your investment and ensuring compliance with local regulations.
Retention Time Requirements
Ensuring sufficient detention time for settling, oxidation, or disinfection, typically ranging from 2 to 8 hours, is crucial. Our designs are tailored to meet specific site conditions, optimizing retention times for maximum efficiency, as demonstrated in our successful projects across various environments.
Equalization Tanks
Incorporating separate balancing tanks to manage sudden flow surges helps maintain consistent process efficiency. This approach has proven effective in multiple installations, helping clients avoid costly disruptions and ensuring long-term operational stability.
Selecting Appropriate Tank Materials
Choosing the right materials for your STP tank is essential for durability and performance. Our expertise allows us to recommend the most suitable materials based on your specific needs and environmental conditions.
Reinforced Concrete
Reinforced concrete is preferred for its durability and chemical resistance, especially in large-scale municipal plants. Our reinforced concrete tanks have successfully withstood harsh environmental conditions for over a decade, ensuring reliability and longevity, as evidenced by our extensive portfolio of completed projects.
Stainless Steel and FRP
Stainless steel and fiberglass-reinforced plastic (FRP) are ideal for specialized tanks or compact urban STPs. FRP offers corrosion resistance and lower maintenance needs, making it an excellent choice for environments with aggressive wastewater characteristics. Our projects utilizing these materials consistently demonstrate superior performance and client satisfaction
Waterproofing Solutions
Utilizing epoxy coatings, membranes, or liners protects against leakage and chemical damage. Our waterproofing solutions have been rigorously tested to exceed industry standards, ensuring long-lasting performance and peace of mind for our clients.
Optimizing Tank Shape and Configuration
The shape and configuration of your STP tank significantly impact its efficiency. Our design team employs advanced simulation techniques to optimize tank geometry for maximum effectiveness.
Rectangular Tanks
Commonly used for sedimentation, aeration, and moving bed biofilm reactor (MBBR) systems, rectangular tanks offer efficient space utilization and ease of maintenance. Our designs have been recognized for their innovative use of space and operational efficiency, earning accolades from industry peers.
Circular Tanks
Ideal for secondary clarifiers and sludge thickening, circular tanks promote uniform flow and effective sediment removal. Our installations have demonstrated improved sedimentation rates due to optimized circular designs, resulting in enhanced treatment outcomes and client satisfaction
Baffles and Flow Control
Incorporating baffles, weirs, and internal walls helps prevent short-circuiting and enhances flow dynamics. Our engineering team has successfully implemented these features in numerous projects, leading to improved treatment performance and client satisfaction.
Effective Aeration and Oxygen Distribution
Efficient aeration is critical for biological treatment processes. Our expertise in aeration technologies ensures optimal performance and treatment efficiency.
Aeration Systems
Choosing between surface aerators, mechanical blowers, or fine bubble diffusers based on tank depth and process type is crucial. Our tailored aeration solutions have been shown to increase oxygen transfer efficiency by up to 40%, significantly enhancing biological activity and treatment outcomes.
Grid Design
Strategically placing aerators ensures even oxygen distribution and prevents sludge buildup in dead zones. Our designs consistently result in improved biological activity and treatment outcomes, reinforcing our commitment to excellence.
Sludge Management Strategies
Proper sludge management is essential for maintaining STP tank performance. Our practical experience allows us to recommend effective strategies that minimize operational disruptions.
Hopper or Sloped Bottoms
Designing tanks with conical bases or gravity slopes facilitates sludge collection and removal. This design minimizes maintenance efforts and downtime, ensuring smooth operations and high client satisfaction.
Sludge Volume Forecasting
Planning for sludge accumulation between cleaning intervals and designing storage or thickening units accordingly is vital. Our predictive models help clients anticipate sludge management needs, ensuring seamless operations and long-term efficiency.
Inlet and Outlet Engineering
Efficient inlet and outlet designs are crucial for optimal tank operation. Our engineering team focuses on precision to enhance performance and ensure compliance with discharge standards.
Uniform Inlet Flow
Distributing influent evenly across the tank using flow-spreading structures avoids localized overloading. This approach has been validated in our projects, leading to improved treatment efficiency and client satisfaction.
Effluent Quality Control
Incorporating scum baffles, overflow weirs, and V-notched outlets ensures clean effluent and prevents solid carryover. Our designs consistently meet or exceed local discharge standards, safeguarding our clients from regulatory issues.
Odor and Gas Management
Managing odors and gases is essential for maintaining a safe and pleasant environment. Our solutions prioritize both effectiveness and compliance with health and safety regulations.
Ventilation
Providing forced or passive ventilation mitigates gas buildup (methane, H₂S). Our designs incorporate best practices to ensure safe operational environments, enhancing community relations and client trust.
Odor Control Units
Utilizing biofilters, carbon scrubbers, or chemical neutralizers, especially in urban or sensitive areas, is crucial. Our odor control solutions have been successfully implemented in numerous projects, enhancing community relations and client satisfaction.
Ensuring Safety and Worker Access
Ensuring safety for maintenance personnel is paramount. Our designs prioritize accessibility and safety, earning us recognition in the industry.
Manholes and Access Hatches
Including safe entry points for inspection, cleaning, and maintenance is essential. Our designs have been recognized for their commitment to worker safety and operational efficiency, ensuring compliance with industry safety standards.
Fall Protection and Confined Space Measures
Equipping open tanks with guardrails and enclosed tanks with gas detection systems and proper PPE protocols is a priority. Our safety-first approach has earned us industry recognition and client trust, ensuring compliance with safety regulations.
Designing for Ease of Maintenance
Designing for maintenance can significantly reduce operational costs. Our focus on maintenance-friendly designs enhances long-term performance and client satisfaction.
Drainage Systems
Ensuring tanks are fully drainable for cleaning cycles, including bottom drains or sump pits, is vital. This feature has proven invaluable in minimizing downtime for our clients, enhancing operational efficiency.
Automation
Automating sludge withdrawal and scum collection where feasible minimizes manual labor. Our automation solutions have been implemented in several facilities, resulting in substantial labor cost savings and improved operational efficiency.
Cleaning Access
Ensuring adequate space and clearance for wall brushing and aerator service is essential. Our designs prioritize easy access to critical components, enhancing maintenance efficiency and reducing operational disruptions.
Incorporating Chemical Dosing Systems
Chemical dosing systems can enhance treatment efficiency. Our expertise in chemical management ensures optimal performance and compliance with treatment standards.
pH Correction
Integrating lime or acid dosing for pH stabilization is crucial. Our systems are designed to maintain optimal pH levels, essential for effective treatment and compliance with regulatory standards.
Coagulant and Flocculant Addition
Installing mixers and dosing pumps for polymers or alum used in clarification or filtration stages is vital. Our solutions have been shown to improve clarification rates significantly, ensuring high-quality effluent.
Hydraulic Design and Flow Management
Effective hydraulic design is crucial for optimal tank performance. Our engineering team specializes in hydraulic optimization, ensuring compliance and efficiency.
Balanced Flow
Designing for plug flow or complete mixing according to process needs is essential. Our designs have consistently improved hydraulic performance in various installations, enhancing treatment outcomes.
Flow Distribution Structures
Utilizing stilling wells, splitter boxes, and balancing chambers for optimized distribution is key. Our innovative designs have resulted in enhanced treatment outcomes, reinforcing our commitment to excellence.
Regulatory Compliance and Sustainability
Adhering to regulations is essential for operational success. Our commitment to compliance and sustainability sets us apart in the industry.
Discharge Standards
Designing effluent quality to meet local norms (e.g., BOD < 30 mg/L, TSS < 50 mg/L) is critical. Our systems consistently achieve compliance, safeguarding our clients from regulatory issues and enhancing their operational reputation.
Energy Efficiency
Implementing variable-speed drives, solar aeration, or energy recovery systems lowers operational costs. Our energy-efficient designs have helped clients reduce their carbon footprint while maintaining high treatment standards.
Sustainable Practices
Considering reusing treated effluent for flushing, irrigation, or cooling tower makeup is a priority. Our sustainability initiatives have garnered positive feedback from both clients and communities, reinforcing our commitment to environmental stewardship.
Automation and Monitoring Systems
Implementing automation can enhance operational efficiency. Our advanced monitoring solutions ensure optimal performance and compliance.
Sensors
Installing real-time monitoring for DO, pH, turbidity, ammonia, and flow provides accurate data for informed decision-making. Our state-of-the-art sensors enable proactive management of treatment processes, ensuring compliance and efficiency.
SCADA Integration
Automating aeration, chemical dosing, and alarm triggers streamlines operations. Our SCADA systems have been successfully integrated into numerous facilities, improving overall efficiency and operational reliability.
Addressing Temperature Sensitivity
Temperature sensitivity is vital for biological processes. Our designs incorporate features to manage temperature effectively, ensuring optimal treatment performance.
Cold-Weather Protection
Insulating or covering tanks in cold climates prevents microbial process slowdowns. Our solutions have proven effective in maintaining operational efficiency in challenging conditions, safeguarding treatment processes.
Temperature Monitoring
Including sensors to track thermal stability, especially in biological tanks, is essential. Our monitoring systems ensure optimal conditions for biological activity, enhancing overall treatment efficacy.
Ensuring Structural Durability
Ensuring structural durability is essential for long-term performance. Our engineering practices prioritize robustness and reliability.
Load Design
Reinforcing tanks to withstand backfill pressure, seismic forces, and hydrostatic loads is crucial. Our designs have been rigorously tested to ensure longevity and reliability, providing peace of mind for our clients.
Corrosion Control
Applying protective coatings and cathodic protection where necessary extends service life. Our corrosion control measures have been recognized for their effectiveness in various environments, ensuring durability and performance.
we are dedicated to providing innovative and reliable STP tank solutions tailored to your specific needs. As a trusted manufacturer and supplier, we ensure that our products meet the highest standards of quality and performance. With numerous successful installations and satisfied clients, we have built a reputation for excellence in the industry. For more information on our STP tanks and services or to discuss your project requirements, please contact us today. Let us help you achieve your sewage treatment goals with confidence and expertise.